
5.28.2014

BEYOND the basics...a new digital class with Shanna Noel
From the SC website:
Take your digital skills to the next level with Shanna Noel. Learn twenty cool techniques to get more from the digital files that Studio Calico offers each month. You’ll be exploring inventive ways to do more with templates, stamp brushes, digital paper, printables and digital die cut files both on your computer and on your papercrafting projects.
If you've ever wondered how to take that "next step" for your layouts (or any paper project, really!), here is your answer!
Shanna Noel is an amazing designer/teacher who creates the most amazing templates/printables and cut files. I can't even begin to tell you just how excited I am for this class! And how ready I am to learn something new!
As with every Studio Calico class, you will get access to a whole bunch of digital files with your enrollment in "BEYOND the basics"...
Just take a look...


BONUS DIGITAL FILES:
- Digital patterned paper (Shanna Noel for Studio Calico)
- Digital Templates (Shanna Noel for Studio Calico)
- Digital Alphabet Stamp Set (Shanna Noel for Studio Calico)
- Digital Stamps (Shanna Noel for Studio Calico)
- Digital Embellishments (Shanna Noel for Studio Calico)
- Digital Die Cut Files (Shanna Noel for Studio Calico)
- Digital Washi Photo Frames (Shanna Noel for Studio Calico)
These files alone are worth the price of enrollment...don't you think? Oh my gosh! Those colors and that alpha??? I die.
And here is what Shanna will be going over in class...
WHAT YOU'LL GET :
- 10 how to videos from Shanna covering techniques for templates, stamp brushes, digital paper, printables and digital die cut files
- 10 tutorials from the contributors covering techniques for templates, stamp brushes, digital paper, printables and digital die cut files
- 20 new digital / hybrid projects to inspire you
- a class message board to interact with Shanna and your fellow students
- new challenges each week
Just FYI...you will need Photoshop or Photoshop Elements and some basic digi-scrapping skills for this course.
Don't have any basic digi-scrapping skills? Not to worry! Studio Calico is offering their Digital Basics course for FREE! Just click here for access...
Really, how could you go wrong? A free starter class and an amazing teacher + EXTRAS to keep you going? Studio Calico has definitely done it again...
As always, I hope to see you in class! The first lesson will be posted June 3!

5.27.2014

it's here, it's here! Hello, Hello!
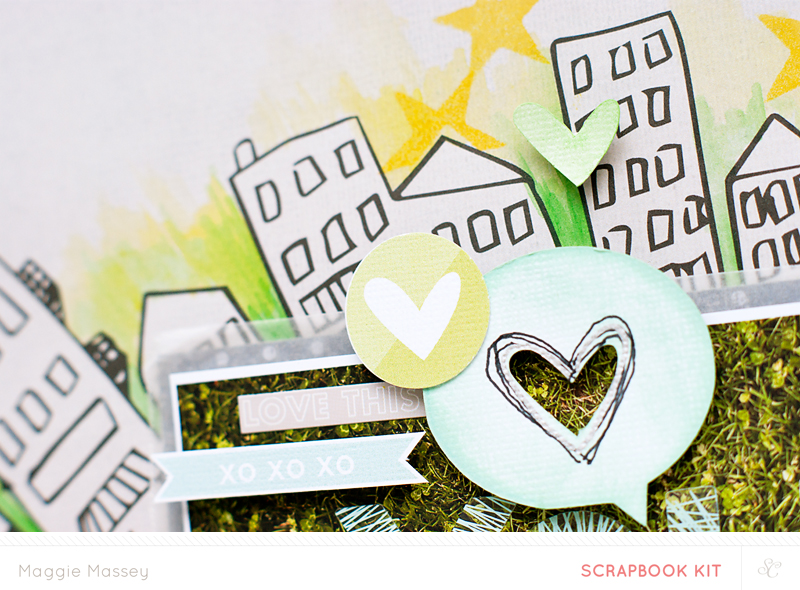
The Studio Calico Hello, Hello kits for June have been revealed! And they are so rad...so. rad.
I'm so excited to share my layouts with you this month...but first, let's take a look at the Scrapbook kits...
OK...amazing, right? Clockwise from top left, these are: the Main Kit, Ni Hao, Hola & BonJour
BonJour is definitely my favorite...but Hola runs a close second...
And here are the layouts I created with these amazing kits...I hope you like them...
For these 1st three I used the Main Kit only...plus a bunch of printables & cut files...

I added some printables from Hello Forever here...


Aaaack! Don't you just love the green & yellow??? The Color Theory paints (blue & yellow) that come in the Main Kit are crazy amazing! For this layout I used the Main Kit as well as the printables & cut files by Hello Forever...
For my next 3 layouts, I used the Main Kit plus Add-ons...PLUS digital items...


And for this layout of my brother and my niece (I love how his arms are around her so protectively here...) I used the Main Kit, and the Ni Hao & BonJour Add-Ons. The little black "NOTEWORTHY" banner is from the In A Creative Bubble printables. I also (if you can see them in this photo) punched a whole bunch of vellum butterflies and sewed them to the background of my page. I love the texture little additions like this create...
So there you have them!
Such beautiful colors in these kits...such amazing patterns, textures, digital items...
Thank you so much for stopping by to take a look! For amazing inspiration using the June Hello, Hello kits, make sure to check out the rest of the Creative Team's gallery HERE!
I hope that I've inspired you to go make something...anything...(smile).
I'm so excited to share my layouts with you this month...but first, let's take a look at the Scrapbook kits...
 |  |
 |  |
I added some printables from Hello Forever here...
And for this one I used the amazing Circle Background cut file from Paige Evans...the Hello Forever cut files, the Hello Forever Printables & the In A Creative Bubble Printables
Here I combined the Main Kit with the BonJour, Hola & Ni Hao Add-Ons...as well as the Céline Navarro & In A Creative Bubble printables...
The colors in this layout make me ridiculously happy...
Here I used the Main Kit & the Hola Add-On...along with the Circle Background cut file & the printables from In A Creative Bubble.
5.16.2014

Hello, Hello! I've got some sneaks...
It's Sneak Time again!
This month's Studio Calico kits are full of bright colors, fun shapes & gorgeous patterns!


This month's Studio Calico kits are full of bright colors, fun shapes & gorgeous patterns!
This mood board just screams summer to me...those colors!
So are you ready for some sneaks? These kits were a blast to play with...
Main Kit & digital items...
Main Kit and digitals...
Main Kit and digitals...
Main Kit, Ni Hao Add-On, BonJour Add-On & digital items...
Main Kit, Hola Add-on & digital items...
Main Kit, BonJour Add-On & digitals...
Eeeeek!
Don't forget! If you're a Studio Calico subscriber, the full kits will be revealed at noon Eastern on the 27th. Join us here at 11:00 a.m. Eastern for a live chat and countdown!
If you're not a subscriber (yet!) the kits will be revealed just 12 hours after pre-sale...at midnight Eastern on the 27th...woot!
Want to subscribe? Just go here...you won't regret it...
5.15.2014

give those dollar bin notebooks a makeover!
We all love the Dollar Spot at Target. It's a fact. I've done research.
It's the first place I go when I step in to the store...and it's the last place I check (just in case they've put anything new out while I was shopping) before I leave.
And when I come across amazing items like these...
...I about lose mah mind.
On a recent trip I saw these lovely little journals and I bought every single one they had. Yep. I'm THAT person. I needed quick & easy teacher appreciation gifts and I just knew these would be perfect.
But before I wrapped them up and sent them along to school with the kids...I decided to dress them up just a bit.

I grabbed some of my stash supplies from Maggie Holmes and Dear Lizzy and got to work giving these babies a little makeover.
I added a few stickers a pieces of ephemera to the fronst of the journals, just to make them a little more personal...


I tried to keep them simple because I'm hoping they are taken out of and put back into purses & bags all day long...and I didn't want the embellishments to wind up stuck to the bottom of someone's bag.
The cover on the kraft/polka dot journal was really very thin...and I imagined it being ripped off easily...so I added a piece of patterned paper to the inside front cover to sturdy it up a bit.

In order to make the new paper look like it belonged there, I cut the paper to include the space beyond the binding coil, lined up the coils with my paper, marked their positions with a pencil and punched holes with the smaller setting on my Crop-A-Dile.
Next, I snipped the paper from the edge to the newly-punched hole...making sure to NOT cut past the hole.
Finally, I pushed each of the holes on the paper around each of the wires on the journal.

When that was all finished, I adhered the patterned paper to the cover so that the pieces acted as one...the cover was now much stronger and the inside front cover was much prettier.
The mint-green journals had a much stronger cover...so I didn't need to a add a piece of paper to them. BUT, I did a piece over the start of the journal paper...just because it looked so darn pretty.
I used a little glue dot to stick a flower cabochon to some mini-clothespins and then used that clothespin to attach a little tag (that the children wrote "thank you" notes on) and a Dunkin' Donuts gift card to the inside of the journal.


And just to add that little something extra, I adhered an envelope or glassine bag to the inside back cover of each journal. It's always nice to have a place to keep little notes or receipts.


And that was it!
A fun way to dress up these little notebooks...without taking away any of their natural "wow!"


Wouldn't these be great to make for your girlfriends as a "just because" gift? Inexpensive and so fun!
It's the first place I go when I step in to the store...and it's the last place I check (just in case they've put anything new out while I was shopping) before I leave.
And when I come across amazing items like these...
...I about lose mah mind.
On a recent trip I saw these lovely little journals and I bought every single one they had. Yep. I'm THAT person. I needed quick & easy teacher appreciation gifts and I just knew these would be perfect.
But before I wrapped them up and sent them along to school with the kids...I decided to dress them up just a bit.
I grabbed some of my stash supplies from Maggie Holmes and Dear Lizzy and got to work giving these babies a little makeover.
I added a few stickers a pieces of ephemera to the fronst of the journals, just to make them a little more personal...
I tried to keep them simple because I'm hoping they are taken out of and put back into purses & bags all day long...and I didn't want the embellishments to wind up stuck to the bottom of someone's bag.
The cover on the kraft/polka dot journal was really very thin...and I imagined it being ripped off easily...so I added a piece of patterned paper to the inside front cover to sturdy it up a bit.
In order to make the new paper look like it belonged there, I cut the paper to include the space beyond the binding coil, lined up the coils with my paper, marked their positions with a pencil and punched holes with the smaller setting on my Crop-A-Dile.
Next, I snipped the paper from the edge to the newly-punched hole...making sure to NOT cut past the hole.
Finally, I pushed each of the holes on the paper around each of the wires on the journal.
When that was all finished, I adhered the patterned paper to the cover so that the pieces acted as one...the cover was now much stronger and the inside front cover was much prettier.
The mint-green journals had a much stronger cover...so I didn't need to a add a piece of paper to them. BUT, I did a piece over the start of the journal paper...just because it looked so darn pretty.
I used a little glue dot to stick a flower cabochon to some mini-clothespins and then used that clothespin to attach a little tag (that the children wrote "thank you" notes on) and a Dunkin' Donuts gift card to the inside of the journal.
And just to add that little something extra, I adhered an envelope or glassine bag to the inside back cover of each journal. It's always nice to have a place to keep little notes or receipts.
And that was it!
A fun way to dress up these little notebooks...without taking away any of their natural "wow!"
Wouldn't these be great to make for your girlfriends as a "just because" gift? Inexpensive and so fun!
5.13.2014

We R Memory Keepers - the Evolution Advanced!
Eeeeek!
You guys!
Have you heard the news?
We R Memory Keepers is launching its BRAND NEW die cutting machine tomorrow exclusively on Home Shopping Network! TOMORROW!
The Evolution Advanced!
This new die-cutting machine is amazing...and it has everything you could possibly want in a die-cutter...
*it's compact...AND it folds up for easy storage!
*it has automatic settings for letterpress, embossing & die-cutting...no more figuring out which plates to use for which process!
*it has built-in storage!
*AND with the addition of a small motor (sold separately) you can turn this manual cutter into an electric cutter!


So cool, right?
Now go mark your calendars! Midnight Eastern TONIGHT!
woo hoo!
You guys!
Have you heard the news?
We R Memory Keepers is launching its BRAND NEW die cutting machine tomorrow exclusively on Home Shopping Network! TOMORROW!
The Evolution Advanced!
This new die-cutting machine is amazing...and it has everything you could possibly want in a die-cutter...
*it's compact...AND it folds up for easy storage!
*it has automatic settings for letterpress, embossing & die-cutting...no more figuring out which plates to use for which process!
*it has built-in storage!
*AND with the addition of a small motor (sold separately) you can turn this manual cutter into an electric cutter!
What?!?! Amazing!
HSN will be offering these little magic-machines for a fantastic price starting at Midnight Eastern TONIGHT! And We R has only a limited number of these little beauties, so you will need to jump on this if you want one (any why wouldn't you want one???)
Wanna see just how it works?
Now go mark your calendars! Midnight Eastern TONIGHT!
woo hoo!
5.09.2014

just a few layouts...
Today I'm sharing the projects I made last weekend for National Scrapbook Day...specifically the layouts I made for Heidi Swapp's #5wordsgiveaway...
See...Heidi was a contributor for Big Picture Classes' NSD10K event...and this was the layout she made...
...5 words to describe her beautiful baby girl, Capri.
Part of Heidi's contribution to the 10K event was a video with some great stenciling tips using her new Mini-Stencils and Jumbo Numbers. Heidi challenged her followers to spend some time over the weekend playing around with the numbers and stencils and creating their own 5 Words layout.
So that's what I did...
And here's what I made...


...and...


...and finally...


I really enjoyed creating these...and they came together fairly quickly (I spent probably 2 hours or so on each one) because Heidi had already done all the really hard work...I just had to make my own versions.
I truly hope these inspire you to do something similar for the people you love. My kids were so excited to see their "words" - I'm pretty sure I made them happy with these...
To see even more "5 words" inspiration, check out the hashtag #5wordsgiveaway on Instagram.
Oh yeah...I used so many different collections on these projects I'm not going to give a supply list...BUT if you see something specific and you'd like to know where it came from, just shoot me a message - maggie@midwesterngirldiy.com - and I'll let you know.
See...Heidi was a contributor for Big Picture Classes' NSD10K event...and this was the layout she made...
...5 words to describe her beautiful baby girl, Capri.
Part of Heidi's contribution to the 10K event was a video with some great stenciling tips using her new Mini-Stencils and Jumbo Numbers. Heidi challenged her followers to spend some time over the weekend playing around with the numbers and stencils and creating their own 5 Words layout.
So that's what I did...
And here's what I made...
...and...
...and finally...
I really enjoyed creating these...and they came together fairly quickly (I spent probably 2 hours or so on each one) because Heidi had already done all the really hard work...I just had to make my own versions.
I truly hope these inspire you to do something similar for the people you love. My kids were so excited to see their "words" - I'm pretty sure I made them happy with these...
To see even more "5 words" inspiration, check out the hashtag #5wordsgiveaway on Instagram.
Oh yeah...I used so many different collections on these projects I'm not going to give a supply list...BUT if you see something specific and you'd like to know where it came from, just shoot me a message - maggie@midwesterngirldiy.com - and I'll let you know.
5.08.2014

inspired by...Heidi Swapp...a little mixed media layout
At the end of last month I was fortunate enough to spend the weekend with two of my very favorite people...
Heidi Swapp & Sarah Bargo! Woo hoo!
Heidi was teaching classes in a town not far from me and Sarah lives near me, too (jealous???) so we were all able to hang for a couple of days!
Heidi's classes covered a whole bunch of mixed media techniques this time around and I have to tell you that I was overcome with inspiration. First of all...if you ever get the chance to attend one of Heidi's classes, you must. And by "must" I mean cancel-all-your-other-plans-and-get-to-that-class-come-Hell-or-high-water. Not only is Heidi one of the best motivational and inspirational speakers I have ever heard, she is also a beautiful, kind & ridiculously talented. But you guys know all that...soooooo...
Anyway...like I mentioned...I was so inspired by Heidi and her projects that I came right home and set to work on a layout that used some of the techniques she went over in class...

Mixed media is not something I'm proficient at...in fact, it's something I'm not even all that decent with. BUT I am practicing...and I am learning...and I am trying and I am playing...and I'm having a BALL!
For this layout I stuck with mainly the new Dreamy Collection & Mini-Stencils (available at your local scrapbook store and online). I also included a few stamps from the Hello Today Collection (at Michaels), as well as some Color Shine & vellum.

To start, I cut a strip of the yellow houndstooth print side of a sheet of Pink Dream. I adhered this to a sheet of Choose Happy paper and stitched down the inside edge.
Next I combined some white acrylic paint with some Mustard Color Shine and spread a thin layer over my paper.
Now is where it starts to get fun...
Using the houndstooth mini-stencil, I applied some Modeling Paste in a few areas over my background and allowed it to dry.
A few sprinkles of Mustard Color Shine and a little yellow stamp ink rubbed on a few of the paste "houndsteeth" - (it's a new word) and I was ready for my photo and embellishments.

Just a few key pieces here and there (as well as some stapled vellum shapes!) was really all this page needed.
I love the way this turned out...and I'm so so grateful to Heidi for sharing her talent...
Supplies:
Subscribe to:
Posts (Atom)


