posts in category birthday
4.11.2012

a new twist for your treat bags...
Yesterday I shared the invitations I made for Kate's 9th birthday party...today I'm going to show you the treat bags she will be giving to her guests...
And these aren't just your average old treat bags...these bags have a little twist...
Do you see what it is?
Well, we'll get to that in just a second...
First I took some plain white paper bags (5x7) and used my Lifestyle Crafts Epic 6 and Letterpress Splendor plates to print the little gift and the words "for you" on the bags. I learned yesterday that it really should NOT take as long as it did for the ink to dry on my invitations. I most definitely used too much ink...I will know better for next time.
Then I took a pink marker and just added a little depth to the gift graphic...

Now here's the twist...
I was looking for a way to close the bags...simple folding is great, stickers are fine, staples are OK, but I wanted something a little different. Suddenly, it occurred to me that a Chips Ahoy bag is perfect! What better way to close a bag than to fold it and make sure it stays folded with those little tab thingies? Now, I know what you're thinking...airplane bags fold the same way...well...yes, they do. But I prefer to compare my bag to one that holds chocolate chip cookies thankyouverymuch.
I found some fabric scraps that were about an inch or so wide and about 10" long (you can use wide ribbon for this, too!)...

I folded the fabric in half width-wise and sewed down the length of the piece...

Then I cut the fabric piece just long enough to extend past both sides of the bag by about 1 1/2"...
Next I grabbed some floral wire and my wire cutter...

I cut the wire to fit inside the strip of folded fabric...with just a little room between the end of the wire and the end of the fabric...about 1/4"...

Then I sewed the ends of the fabric closed...you can see by the photos that I didn't worry too much about having nice crisp seams or super-accurate lines of stitching...and I didn't bother finishing the ends of the fabric...I just left them raw...

After I had finished making my little wire sleeve, I decided where I wanted to place it on my bag. It was so handy that the bag came with a little lip at the top...I was able to sew the sleeve on here without worrying about sewing the bag closed...
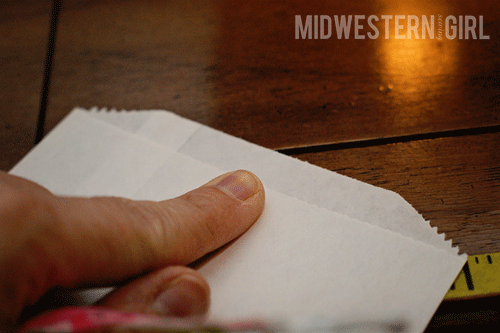
If your bags don't have this lip, just cut one side of the bag down a little to create one...
Sew your sleeve onto your bag...


And make sure you can still open it...
Here's a view of the back...after the sleeve has been sewn on...

And guess what? You're done!
You now have some super-cool treat-bags...with a twist!
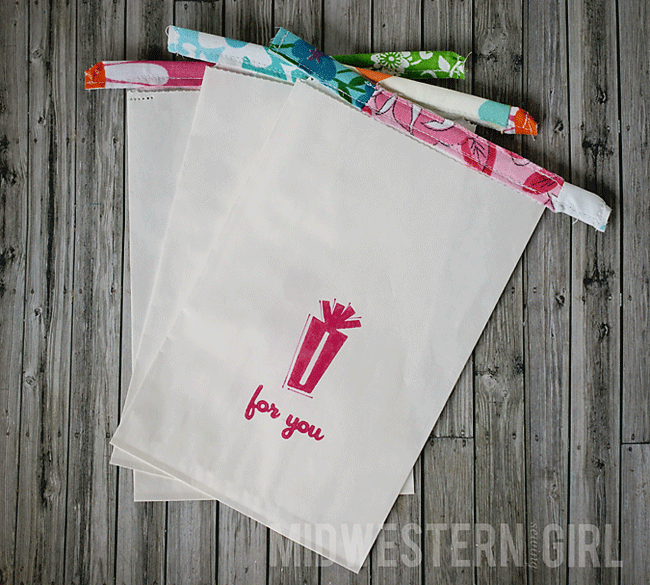

And here they are all twisted up...


You can choose to fold the bags so that the wires fold toward the front, too...I chose to fold them backwards on my bags...
So what do you think? Think you would add this to your next set of treat bags?
DISCLOSURE: Lifestyle Crafts sent me a Letterpress Combo Kit and the printing plates and ink used for the invitations and treat bags. All opinions stated are my own...100%. I think this system is wicked-awesome and I love how the letterpress printing turned out. It's really classy looking...totally different from printing from your home computer and it's super-easy to do.
Here's where I'm linking up this week...
And these aren't just your average old treat bags...these bags have a little twist...
Do you see what it is?
Well, we'll get to that in just a second...
First I took some plain white paper bags (5x7) and used my Lifestyle Crafts Epic 6 and Letterpress Splendor plates to print the little gift and the words "for you" on the bags. I learned yesterday that it really should NOT take as long as it did for the ink to dry on my invitations. I most definitely used too much ink...I will know better for next time.
{***from now through April 15, the Splendor printing plates are 25% off! PLUS, if you use the code MIDWESTERN at checkout, you can an ADDITIONAL 20% off...what the what? awesome!***}
Then I took a pink marker and just added a little depth to the gift graphic...
Now here's the twist...
I was looking for a way to close the bags...simple folding is great, stickers are fine, staples are OK, but I wanted something a little different. Suddenly, it occurred to me that a Chips Ahoy bag is perfect! What better way to close a bag than to fold it and make sure it stays folded with those little tab thingies? Now, I know what you're thinking...airplane bags fold the same way...well...yes, they do. But I prefer to compare my bag to one that holds chocolate chip cookies thankyouverymuch.
I found some fabric scraps that were about an inch or so wide and about 10" long (you can use wide ribbon for this, too!)...

I folded the fabric in half width-wise and sewed down the length of the piece...
Then I cut the fabric piece just long enough to extend past both sides of the bag by about 1 1/2"...
Next I grabbed some floral wire and my wire cutter...
I cut the wire to fit inside the strip of folded fabric...with just a little room between the end of the wire and the end of the fabric...about 1/4"...
Then I sewed the ends of the fabric closed...you can see by the photos that I didn't worry too much about having nice crisp seams or super-accurate lines of stitching...and I didn't bother finishing the ends of the fabric...I just left them raw...
After I had finished making my little wire sleeve, I decided where I wanted to place it on my bag. It was so handy that the bag came with a little lip at the top...I was able to sew the sleeve on here without worrying about sewing the bag closed...
If your bags don't have this lip, just cut one side of the bag down a little to create one...
Sew your sleeve onto your bag...
And make sure you can still open it...
Here's a view of the back...after the sleeve has been sewn on...
And guess what? You're done!
You now have some super-cool treat-bags...with a twist!
And here they are all twisted up...
You can choose to fold the bags so that the wires fold toward the front, too...I chose to fold them backwards on my bags...
So what do you think? Think you would add this to your next set of treat bags?
DISCLOSURE: Lifestyle Crafts sent me a Letterpress Combo Kit and the printing plates and ink used for the invitations and treat bags. All opinions stated are my own...100%. I think this system is wicked-awesome and I love how the letterpress printing turned out. It's really classy looking...totally different from printing from your home computer and it's super-easy to do.
Here's where I'm linking up this week...

4.10.2012

kate's birthday invitations...
My oldest monkey-child will be turning 9 in just a few short weeks...man, oh man...9. Just one year before the double-digits, 7 years before the driver's license, 9 years before the start of college. Incredible...
This year, Kate decided to have a small little party, with just a few of her friends (thank goodness...). We will be taking the birthday girl, and 4 of her bffs, to Justice for a shopping spree and then to Cici's Pizza for dinner...sounds fun, doesn't it?
We made her invitations using my new favorite toy...my Lifestyle Crafts Letterpress system...oh my heck. A few years ago I became aware of this whole letterpress thing and I've always wanted to try my hand at it. Well, now that I have, I'm not sure I could ever go back to store-bought cards and invitations.
These are the printing plates I used...the "Splendor" plates...perfect, huh?


First I squeezed out some hot pink ink onto the ink base...I wasn't sure how much to use, so I kind of winged it. What you see up there was more than enough...

Then I inked up the brayer...this was fun...the ink is kind of sticky and thick (which surprised me a little), so it's fun to playin with...


and bingo-bango...the start of my awesome, CUSTOM invitations...


This year, Kate decided to have a small little party, with just a few of her friends (thank goodness...). We will be taking the birthday girl, and 4 of her bffs, to Justice for a shopping spree and then to Cici's Pizza for dinner...sounds fun, doesn't it?
We made her invitations using my new favorite toy...my Lifestyle Crafts Letterpress system...oh my heck. A few years ago I became aware of this whole letterpress thing and I've always wanted to try my hand at it. Well, now that I have, I'm not sure I could ever go back to store-bought cards and invitations.
These are the printing plates I used...the "Splendor" plates...perfect, huh?
GUESS WHAT? FROM NOW THROUGH APRIL 15, THE "SPLENDOR" LETTERPRESS PLATES ARE 25% OFF! WOO HOO! AND IF YOU USE THE CODE "MIDWESTERN" AT CHECKOUT YOU GET AN ADDITIONAL 20% OFF! NOW WHAT COULD BE BETTER THAN THAT???
And this is how I made the invitations...
Then I inked up the brayer...this was fun...the ink is kind of sticky and thick (which surprised me a little), so it's fun to play
...this is actually a photo of the plate post-printing...but I wanted you to see how it looked with ink on it...
Then I rolled the ink onto the printing plate I chose for the invites, closed the lid on top of the
paper I was using, ran the whole thing through the Epic 6 Tool (which is also a die-cutter AND an embosser...awesome)...
...those foam things are guides so that each paper is lined up the same way as the one before it...perfect impressions every single time...
Here are the 5 that I made (I made one extra just in case I messed something up...which I didn't...a miracle if there ever was one...)...
After these dried (which took a rather long time...like 2 days until they were COMPLETELY dry...I'm wondering if I over-inked), I headed back to the machine and printed "you're invited" in the middle of each white circle. Then, after that dried, I took some rub-ons I had around and added them to the invites.
Oh my gosh...I love these things!!!
Kate wrote out the details on the backs of the cards and we included this little tag in the envelopes...
Yay! Yay! Yay! I also made some little favor bags with the Letterpress system...I'll be posting about those tomorrow...AND I'll be including a little tutorial on something fun I did to dress the bags up a little...here's a little teaser...
Ooooh, have I piqued your interest? I hope so...
DISCLOSURE: Lifestyle Crafts sent me a Letterpress Combo Kit and the printing plates and ink used for these invitations. All opinions stated are my own...100%. I think this system is wicked-awesome and I love how the letterpress printing turned out. It's really classy looking...totally different from printing from your home computer and it's super-easy to do.
Subscribe to:
Posts (Atom)