9.29.2011
Everything Halloween! a preview...
This Sunday starts the Everything Halloween party! Yay! I can hardly wait...grab a button & spread the word!

I hope you've been working on your Halloween projects, recipes & home decor because this will be the place to show them off!
The linky party will start Sunday evening and the first round of features will be posted Tuesday...I can't wait to see everyone's ideas!
Aaaand, don't forget the Halloween-themed giveaway! All linky-party entrants will be eligible to win this awesome pack of Halloween goodies!
Aren't you excited??? I sure am...
Thank you SO MUCH to everyone who has added the party button to their blogs!
Hope to see you Sunday!
9.28.2011
...napkins turned table runner...
While shopping at my neighborhood Kohl's store last week, armed with my Kohl's Cash & 15% off coupon, I ran across this set of napkins...on clearance...for $1.98...yep.
I wasn't quite sure what I was going to do them, but please...$1.98? They weren't leaving the store unless they were leaving with me...(I said this same thing to my husband 13 years ago...except replace "They" with "You're" and "store" with "party"...that's a joke).
I got home, put the napkins on the table and thought...oh, yes...I'm makin' a table runner...and I'm makin' it right. now.
I ran downstairs, stitched the little beauties together (place edges right-sides together and straight-stitch end-to-end) and got this...
I think it's just perfect for fall...the pattern and colors remind me of an old grain sack (but for $1.98... again...$1.98...)
I'm leaving it un-ironed and messy on the table...I think it adds to the rustic charm...plus I'm bein' kinda lazy.
Have you ever bought anything just to use it for something it wasn't intended to be used as? (Have you ever read a sentence 5 times just to figure out it's meaning?)
9.27.2011
do you crochet?
Well, do you?
Up until a week or so ago, my answer to this question would have been..."ummm, no."
BUT, thanks to my sweet-faced friend, Rachel, at Maybe Matilda, I can now proudly say..."Why, yes. I do crochet."
See, Rachel is hosting this super-cool "Crochet Along" over on her blog.

It started a little while ago, but you can definitely just jump right in at any point. If you have never picked up a skein of yarn or a crochet hook, no worries...Rachel will show you step by step EXACTLY what to do. And let me tell you, this girl is an AWESOME teacher. And if you already know your single crochet stitch from your half-double crochet stitch, well then, fantastic! Grab your supplies and get to stitchin'!
We're making this gorgeous cowl...
So pretty, right?
Here's what I have so far...
Not perfect by any means...but it is soooo much fun...
So, if you've ever even thought about maybe learning to crochet, now is your time to do it! Join Rachel (and me!) on this super-fun Crochet-Along!
Up until a week or so ago, my answer to this question would have been..."ummm, no."
BUT, thanks to my sweet-faced friend, Rachel, at Maybe Matilda, I can now proudly say..."Why, yes. I do crochet."
See, Rachel is hosting this super-cool "Crochet Along" over on her blog.
It started a little while ago, but you can definitely just jump right in at any point. If you have never picked up a skein of yarn or a crochet hook, no worries...Rachel will show you step by step EXACTLY what to do. And let me tell you, this girl is an AWESOME teacher. And if you already know your single crochet stitch from your half-double crochet stitch, well then, fantastic! Grab your supplies and get to stitchin'!
We're making this gorgeous cowl...
So pretty, right?
Here's what I have so far...
Not perfect by any means...but it is soooo much fun...
So, if you've ever even thought about maybe learning to crochet, now is your time to do it! Join Rachel (and me!) on this super-fun Crochet-Along!
9.26.2011
I made the Top 5 on Iron Crafter!
So this is the post where I put in a shameless plug for one of my projects...and a plea for your vote...
I entered my Curbside Mirror Makeover into the Fireflies & Jellybeans Iron Crafter competition (the "secret ingredient" was mirrors...) and I was chosen to be in the Top 5! Yay!
Soooo, I would love if you would go on over to F&J and place your vote for me! OR for any other project you think is awesome...which they all are...
Thanks, guys!!!
Everything Halloween party starts next week!
I am kicking off my very first Everything Halloween party next Sunday! Yay!
Start working on those Halloween projects, 'cause there will be a super-cool linky party (starting Sunday, Oct. 2 and running through Saturday, Oct. 8)! And tons of features from around blogland! There may even be a Halloween-themed gift pack giveaway...hint hint...
So grab a button and help spread the word!
9.22.2011
Upcycled Sweater Pillow Cover
I'm sure you saw these sweater-covered pillows everywhere last year...usually priced at upwards of $50...
Well, I made my own...before I was blogging...so, no photos...BUT, it's not hard at all...and hopefully my explanation alone will be enough...
I took one of our old sofa pillows...it was oversized (about 24"x24") and covered in this BRIGHT red, blue & gold geometric-patterned fabric...um, yuck.
Then I picked up a fisherman's sweater (size Men's XL) at Goodwill for $6.00...
I shoved the pillow into the sweater and positioned it so that the button at the neckline and the overall pattern of the knitting was a little off-center...
Then I just cut off the sweater's arms and the excess knit around the bottom and the collar, tucked in the raw edges and whipstitched the seams closed. I love the way it looks...the texture and warm, cozy feeling it adds to my fall & winter decor is perfect...and I didn't have to pay mucho dinero for it...that's the best part.
9.20.2011
...super-quick curtain fix...or how I made my ceilings taller in 30 minutes...
As much as I would love to live in a house with 13' ceilings, I simply do not.
I can do my darndest, however, to make them look taller...
Enter my regular, already-hangin' curtains...
Here they are before the fix...
I can do my darndest, however, to make them look taller...
Enter my regular, already-hangin' curtains...
Here they are before the fix...
(Never you mind the too-short sheers...they'll have their day...)
Not that they look bad, I just think they could look better...and they really are just too too long...
I took those babies down, flipped 'em over, took some white muslin (about 5" wide) & sewed it just under the original top rod opening (for these drapes it was about 3" down from the very top - DO NOT sew down the sides...just across the top & bottom of the muslin strip)...
Easy peasy...I didn't even bother ironing or measuring super-precisely because I knew this fabric would never be seen...it's merely functional...
I finished up both panels & put 'em right back on the rod (through the new pockets I just created)...
Instant ceiling height (well...the illusion of ceiling height anyway...).
And it helped the bottoms, too...
What do you think?
I really like the new look...to me, it's a little less harsh and a little less messy looking...
...and I didn't have to move the rod hardware in order to get the same look...yay!
9.19.2011
Whisker Graphics Giveaway - a Winner!
Thank you so much to everyone who entered the Whisker Graphics giveaway!
The winner of the $25.00 gift certificate is...


9.16.2011
NUMB3R Wall Art
I first shared this project over at my dear friend, Jaime's, blog, Crafty Scrappy Happy, when I co-hosted her wonderful new linky party, Crafty Scrappy Happy Me. Thursday...
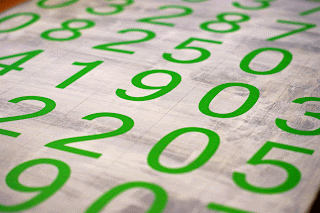
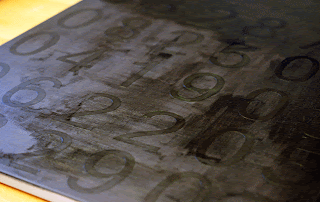
Each row of numbers on this canvas is important to the members of my family (they are all of our birth dates & our wedding date)...but what I like best is that the meaning isn't overtly obvious...in fact, it's subtle enough that I don't feel weird about hanging it in my living room...
First, let me show you where I got my initial inspiration for this project...
As soon as I saw this art from Andrea Steed, I knew I wanted to do something similar...
So here's what I did...
I found an old canvas that I bought a few years ago...mine was 24"x30"...grabbed some white, black & grey (not shown) art paint...and got to work.
First, I quickly (really quickly) painted the entire canvas with a coat of grey paint. It wasn't perfect, and it didn't need to be...you'll see why in a minute.
When that dried I went over the grey with white - this coat was even sloppier than the first...I didn't worry about completely covering the grey, because I knew I wanted the grey to show a little...
Then I marked off the canvas into equal parts with a ruler & pencil, making sure I had enough room for all of my dates...don't worry about the pencil lines...they'll be covered...
Next I used my Silhouette to cut out the numbers I needed from vinyl...but you certainly don"t need a Silhouette for this project. You could free-hand the numbers or print them out in a font you like, then cut them out for the next step...or you could buy the numbers from a craft or home improvement store...
I took my numbers and placed them onto my canvas...making sure that all of the edges were firmly pressed down...
Then I took my black paint and went over the entire canvas...I made sure the black completely covered all of the grey/white areas, including all of the edges of the canvas, but you could choose to give it a little more worn/shabby look by just doing a sloppy coat over the numbers...
When the paint was completely dry, I simply peeled off the vinyl numbers...
I love the way it looks in my living room...it reminds me of the old arrival & departure boards at the airport...I think it gives just the right "urban" touch to this space...and it's wonderfully personal...bonus.
9.14.2011
...paper bag packaging...with Whisker Graphics
Today I wanted to share something I threw together with one of the Whisker Graphics Bigger Bitty Bags...these bags are 6.25" x 9.25", so they're large enough to wrap small packages...
Just grab a bag...
Open it up...and then iron it flat (carefully...remember this is paper...you don't want it to burn...)
Find what you want to wrap...
And do it up...
Easy, inexpensive & there's no cutting huge rolls of wrapping paper involved...
And don't forget about the wonderful Whisker Graphics giveaway going on right now!
9.13.2011
...curbside mirror makeover...
I have never seen my husband look so mortified...
On my way back from the kids' bus stop late last spring I saw that my neighbor (who was getting ready to move) had put some items out by the curb for the garbage pickup...
"oooooooh!" (thought I) "what's this? a mirror? and some bolts of fabric?"
Quickly, quickly...before anyone else could see that I was making this huge score (because in my mind, EVERYONE wants to dig through their neighbor's discarded home decor), I tucked the fabric under my arm, grabbed the mirror and run-walked to my driveway...feeling just like that lady in the IKEA commercial who is screaming at her husband to start the car because she feels like the deals she just got must have been a mistake...yep. that was me.
Here's the mortified husband part...he looked at me and my arms full of treasure, and said, "You got those where???" And then, "Did anyone see you???" Hmmm. Not really the reaction I was looking for.
Promptly turning on my heel, I headed downstairs and dropped off the mirror and fabric in the "Pile 'O Stuff to be Worked On at Some Point, Only Not Right Now."
Fast forward to late summer...last Wednesday, to be exact...after the "Epic Fail" wall art...I was thinking about what to hang on Kinsley's "Big Wall," when I remembered the mirror...aha. The fabric will be discussed at a later date...
A quick trip to Hobby Lobby for some inspiration...and presto change-o...
Here's what I used:

On my way back from the kids' bus stop late last spring I saw that my neighbor (who was getting ready to move) had put some items out by the curb for the garbage pickup...
"oooooooh!" (thought I) "what's this? a mirror? and some bolts of fabric?"
Quickly, quickly...before anyone else could see that I was making this huge score (because in my mind, EVERYONE wants to dig through their neighbor's discarded home decor), I tucked the fabric under my arm, grabbed the mirror and run-walked to my driveway...feeling just like that lady in the IKEA commercial who is screaming at her husband to start the car because she feels like the deals she just got must have been a mistake...yep. that was me.
Here's the mortified husband part...he looked at me and my arms full of treasure, and said, "You got those where???" And then, "Did anyone see you???" Hmmm. Not really the reaction I was looking for.
Promptly turning on my heel, I headed downstairs and dropped off the mirror and fabric in the "Pile 'O Stuff to be Worked On at Some Point, Only Not Right Now."
Fast forward to late summer...last Wednesday, to be exact...after the "Epic Fail" wall art...I was thinking about what to hang on Kinsley's "Big Wall," when I remembered the mirror...aha. The fabric will be discussed at a later date...
...and yes, I do have knees, etc., attached to those disembodied-looking legs...yikes, that looks kinda creepy.
A quick trip to Hobby Lobby for some inspiration...and presto change-o...
Here's what I used:
Plus some white spraypaint...
First I covered my mirror with painters tape & newspaper and sprayed the frame white.
Then see those wood & cork circles up there? I mod-podged some decorative scrapbook paper I had on hand over those and painted the edges white...
Then I just glued all the circles on randomly until I was happy with the look...
After I hung up the mirror I simply placed some extra little mirrors on the wall around the larger mirror with sticky-tack.
...see...there's the rest of my body...at least most of the parts that were missing from the other photo...
One of-a-kind mirror-art for under $10.00...whaddaya think?
Click here to see all of the amazing places I'm linking up to...
Plus...

Subscribe to:
Posts (Atom)


