
10.31.2012

HAPPY HALLOWEEN!
ENJOY YOUR DAY!
AND EAT LOTS OF CANDY (that way I won't feel so guilty when I do...)
all graphics by Rhonna Farrer - Rhonna Designs

10.30.2012

Stitching on paper...a Silhouette tutorial
I've received a number of questions about a recent scrapbook layout I made for the Heidi Swapp Media Team...this is the layout:
And this is what I've gotten questions on...

This embroidered frame/word...
So, today I'm going to share just how I did it! All you need is your Silhouette software, your Silhouette machine and your imagination (oh, and some embroidery floss & a needle!) and you can embroider any design you like onto paper...fun, huh?
STEP 1:
Open your Silhouette software and choose your files (I used digital files available from Heidi Swapp...to learn how to change .png files into .studio files, click here)

STEP 2:

STEP 3:

STEP 4:

STEP 5:

STEP 6:

That's it! Easy peasy...
Now, if you don't want to add the frame to your word...you want to simply cut a word (or other shape) to embroider, skip steps 3 & 6. Play around with this - you can really do so many cool things with your Silhouette!
And this is what I've gotten questions on...
This embroidered frame/word...
So, today I'm going to share just how I did it! All you need is your Silhouette software, your Silhouette machine and your imagination (oh, and some embroidery floss & a needle!) and you can embroider any design you like onto paper...fun, huh?
STEP 1:
Open your Silhouette software and choose your files (I used digital files available from Heidi Swapp...to learn how to change .png files into .studio files, click here)
STEP 2:
STEP 3:
STEP 4:
STEP 5:
STEP 6:
Now, if you don't want to add the frame to your word...you want to simply cut a word (or other shape) to embroider, skip steps 3 & 6. Play around with this - you can really do so many cool things with your Silhouette!
10.29.2012

{mo}tography - online photography class...a giveaway!
So, by now, we all pretty much have smartphones, right?
And we are all using them all of them time, right?
For talking, texting, surfing the web, etc...everything...right???
One of the things I use my phone most often for is taking photos...yep...taking photos. Everywhere...and of everything. You, too? Good.
Think you're using your phone and all of it's photography apps to their fullest? Wanna learn more? Yeah...me, too.
Well, we're in luck!
Heidi Swapp & Jessica Sprague, two of the biggest names in scrapbooking & digital design, have teamed-up to offer an amazing online class just for those of us who want to do more with our camera phones...
a Rafflecopter giveaway
And we are all using them all of them time, right?
For talking, texting, surfing the web, etc...everything...right???
One of the things I use my phone most often for is taking photos...yep...taking photos. Everywhere...and of everything. You, too? Good.
Think you're using your phone and all of it's photography apps to their fullest? Wanna learn more? Yeah...me, too.
Well, we're in luck!
Heidi Swapp & Jessica Sprague, two of the biggest names in scrapbooking & digital design, have teamed-up to offer an amazing online class just for those of us who want to do more with our camera phones...
|
| link |
Seriously??? How awesome is this?!?! And for only $19??? Oh, yes.
AND, it's for both i-Phone AND Android users...coolest. thing. ever. These girls have really got us all covered...
Jessica gives tons more info about the class here...go on and check it out...AND THEN - come on back here and enter to win a seat in the class!!! You read that right...win a seat right here!
Just enter using the Rafflecopter below...and for even more chances (this just keeps getting better and better!) you can visit my fellow Heidi Swapp Media Team members' blogs (see the links in my sidebar) and enter on their sites, too! (***note: Lindsay Bateman is in Hawaii and will not be giving away a seat on her blog...BUT, Jennifer Evans will be giving away two seats! yay!!!***)
The giveaway will run until Sunday, November 4, and the winner will be announced Monday morning (the 5th). Good luck! And I hope to see you all in class!
a Rafflecopter giveaway
10.23.2012

Heidi Swapp Vintage Chic meets 1973
This week, our assignment for the Heidi Swapp Media Team was to use Heidi’s Vintage Chic line with retro photos. I was REALLY excited about this one because Vintage Chic is my favorite of Heidi’s current lines…the colors, the designs…just the overall FEEL of the line fits perfectly with my style. I started looking through a box of old photos my Mom had around and came across two photos that I wanted to use. The first is of my Mom and me on my very first Easter…in March of 1973. The second is one of my Dad holding me on that same day, and is a little bittersweet for me to scrap. You see, my Dad died this past January after being sick for a long time and seeing him so young and happy and holding little baby me is a little sad…but wonderful, too.
I used a sheet of the Bookkeeping paper as the base for my layout. I seriously adore this design and I’m pretty sure that I could use this exact paper on every single layout I do…it’s just that perfect.
I cut a whole bunch of Heidi’s digital Banner Delights out using all of the different Vintage Chic papers, and used them throughout my layout to highlight my photos. The digital banners are some of my favorite digital files, so when I’m cutting them I cut tons of them in all different papers just so I have them when I need them.

I really love how the washed out colors from the photos fit so well with the teals, yellows and faded grungy papers in the line. The yellow bushes that my Dad is holding me in front of are the EXACT color of the B-side on the Worldwide paper.

I grabbed some Mint Green Color Shine and splattered it across the top of my layout for some added color…
I do this by simply removing the sprayer from the bottle and shaking it over my paper…it gives me just a little splatter without too many large ink blots.
The layout also has a pretty masculine vibe to it, so to “girl it up” a little, I added some butterfly punches (which I love…and add on almost every single project I make)…

To make the frames around the photo of me with my Dad, I did a number of things:
First I took a sheet of Worldwide paper and used my Silhouette to cut a Vintage Instaframe (from Heidi’s digi-files) from it.
Then I used one of Heidi’s digital words (from the Gratitude files) – MEMORY – and welded it to another Vintage Instaframe using the Silhouette software.
I cut the frame and word out of plain white cardstock and inked up the edges a bit with both sand-colored ink and some more Mint Green Color Shine (I used a Q-tip this time…I dunked it into the bottle and wiped it around the frame).
Then I did another fun thing with this frame – instead of completely cutting the word out, I used the perforation cut setting on the edges of each of the letters…

I took the perforations and used them as a template/embroidery guideline. I love the way this looks and thinks it adds some fantastic texture to my project…

I also added a few Sentiment Stickers around the frames. I adore these stickers because they say exactly the perfect things for any layout you’re creating…(for my layout I used “never forget” “i love love love you” and “i love you everyday.” And their weathered paper look, random shapes & antique typewriter font make them absolutely perfect accessories for the Vintage Chic line.

I’m so looking forward to diving back into the boxes of old photos lying around around…to finding more images that need to be scrapped and enjoyed on a regular basis. And I am so grateful for having been given this project…it was a wonderful chance for me to reconnect in a way with my Dad…and to remember, yet again, just how much I love him.
10.15.2012

easy Halloween treat box...
*This post first went live at Sew Woodsy a few weeks ago...today I wanted to share it here...*
I couldn't be more excited that it's autumn...I adore this time of year. The cool weather, the gorgeous leaves, the warm sweaters, the smell of cinnamon & pumpkin...oh, I get so happy just thinking about it all! And with the change of seasons comes, you guessed it, HALLOWEEN! Yay! I love Halloween...and the older I get, the more I love it.
This year we were in need of a fun new way to hold all of the goodies we'll be passing out on the 31st (our old bowl took a header off the table and got stepped on last year)...so I decided to make one.
This box can be decorated in any way you like and doesn't have to be used specifically for Halloween. Here's what I started with...

Yep. Just a plain old Tyson Chicken box. I usually just toss these in the recycling bin, but no more! I will be re-using them for a whole bunch of projects!

I modified the original box by removing the side flaps...so that when the box closes, the top simply rests on the rest of the box and the front flap folds over...does that make sense??? Then I added velcro to the front flap and the corresponding place on the box so that the lid stays closed.
Here's all I did...I spraypainted the box black, designed some graphics in Photoshop, printed them out and glued them to the box. Then I inked the edges and roughed up the box a bit with sandpaper to give it an antique-y feel...


Then I simply filled the box with treats...(which I'm sure will have to be replenished looooong before Halloween).

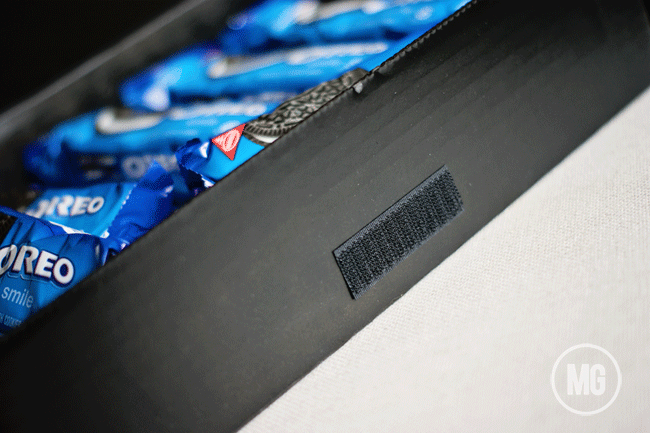
Here's the velcro...
You can also use the box just as a decoration...here I've tied some old sheet music and string around it to make it look even more authentic...


So there you have it!
Fun, huh???
*Skull & Crossbones graphic from Rhonna Farrer: "Hexes & Curses" font EcuyerDAX*
10.11.2012
.png)
Introducing...The Company Boutiques!
I love love love Daily Deal sites...truly...I can't get enough of them. It's like a surprise every day...and I love surprises...(well, I love good surprises).
A brand new Daily Deal site is launching TODAY and I'm so so excited to introduce you to it!


A brand new Daily Deal site is launching TODAY and I'm so so excited to introduce you to it!
.png)
The Company Boutiques is having it's Grand Opening RIGHT NOW, and you DO NOT want to miss it!. Let me give you an idea of just some of the items that will are available starting today...

OK...these are awesome. I ADORE these utensils...and they will be up for grabs at over 70% off! You will get 16 total pieces (8 of each fork & spoon).

These shabby flowers (available in over 10 colors) are being offered today for FREE! Did you read that right? Yes, you did...FREE! All you have to pay is shipping...ummmm, AWESOME!

Gorgeous curling ribbon in 8 different prints is also being offered for FREE...what the what??? (Again, you will be responsible for shipping).

Who doesn't like washi tape? Nobody...that's who. And The Company Boutiques is offering 10 different prints at over 70% off regular price! I think I'm definitely going to have to get me some of those stars...yep...definitely.
These wonderful Rhinestone Ball necklaces are available (starting tomorrow!) in 10 different colors...and they will be over 70% off their regular price!
Pretty fantastic, huh???
Head on over to The Company Boutiques and sign up to receive their emails so you never miss a fantastic deal.
And find The Company Boutiques on Facebook, too!

Today on the Heidi Swapp blog, I'm sharing a couple of projects I've made with Heidi's new Color Shine. Have you heard of it? Well, it's amazing. It's a spray mist that you can use to color just about anything...here, take a look...
With a lot of my projects, I start with one idea in mind and end up with something entirely different.
My Color Shine project was no different.
I started a number of different things and, as time went by, I scrapped them all. I did know that I wanted to make sure I included a number of different things...I wanted to show you how versatile Color Shine is...you do not have to be a paper crafter/scrapbooker/card-maker to love it. I also wanted to show you how amazing the color is. And I wanted to show you how easy it is to use. So I combined my love for Instagram, my love for fabric, my love for photography and my love for Color Shine and this is what I came up with.
I started with some grey duck cloth (like a heavy canvas) and cut 3 pieces to fit a frame I got on clearance from Target. Then I cut some adhesive vinyl Vintage Instaframes from Heidi's Digital Files, adhered the negative cuts to the fabric and sprayed my Black Velvet Color Shine (my ABSOLUTE favorite) over the open spaces. Just like that. One layer of spray was all that was needed.

Then I simply added some of my Instagram photos to the middle of the "frames" with washi tape (another favorite of mine). The photos are easily interchangeable for the season (or my mood) and I can even add journaling or other photos under the frames if I choose to.

For a project like this, I would normally use acrylic paint. But, if you've ever worked with acrylics and fabric, you know that the paint hardens and makes the fabric less flexible. Not to mention, it's hard to get even coverage.
The Color Shine is completely different. The mist becomes part of the fabric instead of just sitting on top of it, so the fabric stays flexible and not "crusty" looking. And the Color Shine has this gorgeous iridescence that really adds to the depth of the color. You have to see it to believe it.
I'm so excited to try my other Color Shine colors on more fabric projects...I'm thinking monogrammed library bags for each of my kids...OH! And wouldn't some personalized canvas wrapping paper look fantastic around Christmas or birthday presents? Maybe even Color Shine'd pillow shams or curtains!
**One tip...because of the consistency of Color Shine, I don't recommend using it on loosely woven fabric like light or sheer cotton. I think it would end up spreading through the fiber threads too quickly, and your designs wouldn't stay crisp. However, if that's the look you're going for, something more fluid and shapeless, it would be beautiful.**
Now, as I was working on this project, I was inspired by my fellow Media Team member, Jamie Pate, to create some paper flowers. So I grabbed my Black Velvet and my Mint Green and got to work on some flowers...I think I'm going to add these to our Christmas tree this year.

I misted a 6"x12" piece of Color Magic paper with the Mint Green, cut it into 1/2" strips, folded the strips back on themselves, and glued them to a round piece of chipboard. Then I simply cut a piece of Vintage Chic Beautiful Songs paper, adhered it to another chipboard circle and glued it to the middle of the flower. Easy peasy.

Here's one I did with the Black Velvet mist...

Oh my gosh, I love how this turned out...that Black Velvet is just phenomenal.

Here's another fun thing about Color Shine. You can use it in a bunch of different ways and get a bunch of different results. The traditional, and obviously, the intended way to use it is to spray it on your projects. This gives you fantastic color, and quick results. BUT, you can also sponge it on for a deeper, more saturated color. Let me show you an example...

The top two photos are of a piece of Color Magic paper that I simply misted with my Black Velvet. Gorgeous black, right? Now the bottom two photos are of paper that I sponged the Black Velvet on to. Is that amazing? Yes. Yes, it is. The color is so completely saturated and bold.
All I do is take a regular old kitchen sponge, get it a bit damp (damp enough so that it is flexible), add a little bit of Color Shine by dabbing the bottle on the sponge and rub it over my paper. The Shine goes a looong way and the color can be applied in layers without making your paper too wet. I usually wait until the Color Shine is dry on my paper and then I simply rub the extra off the resist parts of the paper, or spray a paper towel with some Windex and lightly rub those areas. This way of applying your Color Shine does take a little extra time, but there is a little less mess and a little waste this way.
Try using your Shine both ways on different projects...you will love the variety of looks you can get!
Check out Heidi's blog all this week and next for different ways to use Color Shine!
With a lot of my projects, I start with one idea in mind and end up with something entirely different.
My Color Shine project was no different.
I started a number of different things and, as time went by, I scrapped them all. I did know that I wanted to make sure I included a number of different things...I wanted to show you how versatile Color Shine is...you do not have to be a paper crafter/scrapbooker/card-maker to love it. I also wanted to show you how amazing the color is. And I wanted to show you how easy it is to use. So I combined my love for Instagram, my love for fabric, my love for photography and my love for Color Shine and this is what I came up with.
I started with some grey duck cloth (like a heavy canvas) and cut 3 pieces to fit a frame I got on clearance from Target. Then I cut some adhesive vinyl Vintage Instaframes from Heidi's Digital Files, adhered the negative cuts to the fabric and sprayed my Black Velvet Color Shine (my ABSOLUTE favorite) over the open spaces. Just like that. One layer of spray was all that was needed.
Then I simply added some of my Instagram photos to the middle of the "frames" with washi tape (another favorite of mine). The photos are easily interchangeable for the season (or my mood) and I can even add journaling or other photos under the frames if I choose to.
For a project like this, I would normally use acrylic paint. But, if you've ever worked with acrylics and fabric, you know that the paint hardens and makes the fabric less flexible. Not to mention, it's hard to get even coverage.
The Color Shine is completely different. The mist becomes part of the fabric instead of just sitting on top of it, so the fabric stays flexible and not "crusty" looking. And the Color Shine has this gorgeous iridescence that really adds to the depth of the color. You have to see it to believe it.
I'm so excited to try my other Color Shine colors on more fabric projects...I'm thinking monogrammed library bags for each of my kids...OH! And wouldn't some personalized canvas wrapping paper look fantastic around Christmas or birthday presents? Maybe even Color Shine'd pillow shams or curtains!
**One tip...because of the consistency of Color Shine, I don't recommend using it on loosely woven fabric like light or sheer cotton. I think it would end up spreading through the fiber threads too quickly, and your designs wouldn't stay crisp. However, if that's the look you're going for, something more fluid and shapeless, it would be beautiful.**
Now, as I was working on this project, I was inspired by my fellow Media Team member, Jamie Pate, to create some paper flowers. So I grabbed my Black Velvet and my Mint Green and got to work on some flowers...I think I'm going to add these to our Christmas tree this year.
I misted a 6"x12" piece of Color Magic paper with the Mint Green, cut it into 1/2" strips, folded the strips back on themselves, and glued them to a round piece of chipboard. Then I simply cut a piece of Vintage Chic Beautiful Songs paper, adhered it to another chipboard circle and glued it to the middle of the flower. Easy peasy.
Here's one I did with the Black Velvet mist...
Oh my gosh, I love how this turned out...that Black Velvet is just phenomenal.
Here's another fun thing about Color Shine. You can use it in a bunch of different ways and get a bunch of different results. The traditional, and obviously, the intended way to use it is to spray it on your projects. This gives you fantastic color, and quick results. BUT, you can also sponge it on for a deeper, more saturated color. Let me show you an example...

The top two photos are of a piece of Color Magic paper that I simply misted with my Black Velvet. Gorgeous black, right? Now the bottom two photos are of paper that I sponged the Black Velvet on to. Is that amazing? Yes. Yes, it is. The color is so completely saturated and bold.
All I do is take a regular old kitchen sponge, get it a bit damp (damp enough so that it is flexible), add a little bit of Color Shine by dabbing the bottle on the sponge and rub it over my paper. The Shine goes a looong way and the color can be applied in layers without making your paper too wet. I usually wait until the Color Shine is dry on my paper and then I simply rub the extra off the resist parts of the paper, or spray a paper towel with some Windex and lightly rub those areas. This way of applying your Color Shine does take a little extra time, but there is a little less mess and a little waste this way.
Try using your Shine both ways on different projects...you will love the variety of looks you can get!
Check out Heidi's blog all this week and next for different ways to use Color Shine!
10.10.2012

Blast from the Past! quick & easy Halloween snack...
Halloween is just around the corner! Woo hoo!
This year I haven't made tons of time for Halloween projects, so I wanted to share just a couple of my favorites from last year...
This is a snack I made for a kids' Halloween party - it went over like gangbusters! Not only are these little guys adorable, but they are also extremely economical & tasty!
Here are my little Mummy Pretzels...
Cute, huh?
If you saw these last year, and you made them, I'd love to know...
Here's all you need to make them...

I got the little eyes in the craft department at Wal-Mart...near all of the baking supplies...and you know what the almond bark is, right? I got mine at, again, Wal-Mart, by the cake mixes, etc...they have chocolate, too...it melts really quickly and is really easy to work with. I think they sell the candy eyes all over now, so you shouldn't have too much trouble finding them.

How is your Halloween decorating going? Have you finished? Have you started? Are you already thinking about Thanksgiving & Christmas? (Please say "no" to that last question...;))
This year I haven't made tons of time for Halloween projects, so I wanted to share just a couple of my favorites from last year...
This is a snack I made for a kids' Halloween party - it went over like gangbusters! Not only are these little guys adorable, but they are also extremely economical & tasty!
Here are my little Mummy Pretzels...

Cute, huh?
If you saw these last year, and you made them, I'd love to know...
Here's all you need to make them...

I got the little eyes in the craft department at Wal-Mart...near all of the baking supplies...and you know what the almond bark is, right? I got mine at, again, Wal-Mart, by the cake mixes, etc...they have chocolate, too...it melts really quickly and is really easy to work with. I think they sell the candy eyes all over now, so you shouldn't have too much trouble finding them.

How is your Halloween decorating going? Have you finished? Have you started? Are you already thinking about Thanksgiving & Christmas? (Please say "no" to that last question...;))
10.02.2012

How I am managing to NOT spend a ton of money on Halloween costumes...#CookiesKids #CBias
***Keep reading to get your code for 10% off (no minimum order!) from Cookie's Kids!***
Last year I spent $100 on Halloween costumes. Yes. $100. And my kids wore them for 2 hours. Oh my gosh, even just thinking about it makes my tummy hurt.
I vowed to myself that I would NOT do that again this year.
So when I asked the kids what they wanted to be for Halloween, I was dreading their responses. I was pleasantly surprised, though, to hear that...
Kinsley wants to be Katniss Everdeen...

Grayson wants to be a zombie...

And Tyler wants to be a vampire...(that stinkin' adorable costume is from Pottery Barn Kids)...
OK...I may be able to work with these. I have never been one to make my kids' costumes...and that is for no other reason than that I am lazy. And I would rather be doing something else with my spare time. I have friends who have made the MOST amazing costumes for their kids...and I think it's absolutely wonderful. It's just not me.
So, this year I'm thinking that maybe I could buy REAL clothes for my kids, and pass them off as Halloween costumes. Oh yeah. That's my challenge.
I headed over to Cookie's Kids online to see what I could find. Have you ever shopped there? Either online or in one of their brick and mortar stores? Well, I had never shopped there either...but I gotta tell ya, I was so excited by what I found. Amazing kids' fashion...brand names...excellent prices. Take a look at just a few of the things they have available for sale...

Yeah. Those are brand names you see up there. And the prices? They can't be beaten. Here's just a little more...

I LOVE how you can get outfit ideas with just the click of a button! I will definitely be back to shop here...but, for now, I needed to focus on Halloween...
Here is what I found for each of the kids...(check out my entire shopping trip here on Google+).

Kinsley's Katniss Everdeen Halloween costume
This was my first idea for her...I ended up not getting the brown pants, the Guess shirt or the boots...
This was my first idea for her...I ended up not getting the brown pants, the Guess shirt or the boots...


Ty's Vampire Halloween Costume
This will work just perfectly...except for the tie and handkerchief...we'll put those aside for another time.


This will work just perfectly...except for the tie and handkerchief...we'll put those aside for another time.
I placed my order and received the clothing in just a few days...and I couldn't have been more happy.
3 "costumes" for under $60? Oh yeah...that's my kind of Halloween. Especially if the kids will be able to reuse these items.
OH! One more thing...Cookie's Kids has $5 shipping ALL THE TIME! And there are always coupons available to help you save even more! Just sign up for their emails, and you will get them delivered right to your inbox...
Now for the fun part. Kinsley was really excited to try her "costume" on, and because there wasn't too much "extra" stuff that needed to be added to hers, she got dressed right away.
Here's how her Katniss costume turned out...
OK...I seriously love this. She ended up wearing her own boots, which was great for me, and I picked up an archery set in Target's Halloween section. Just perfect. AND she loves the top and pants, so I know she will wear them again...woo hoo! One down, two to go...
Unfortunately, Grayson, my middle son came down with a bug just before I was going to get his photos done...and I just didn't have the heart to make him dress up...but I know he will look awesome. He loves the clothes he got for his "costume" and he can hardly wait to try out his whole zombie look.
Now, Tyler, my 5-year-old is a stubborn little child. Absolutely adorable, but incredibly stubborn. So when I asked him to get dressed in his costume he informed me that he was NOT going to put on makeup and he did NOT want me to do his hair...sooooo...you pick your battles I guess.
But here he is as a vampire...
Hmmm...did I mention he's stubborn? No smiles for me...
Don't his clothes look great, though??? And if he wants to capeless, he can still pull off the whole vampire thing...(as long as he lets me do his hair and makeup on Halloween...).
There's a little smile...yay. Success.
So, what do you think? I'm thinking this will NOT be the last time I find "real" clothes to use for costumes and it will NOT be the last time I shop at Cookie's Kids.
Find Cookie's Kids online or, if you are from the New York City area, check out their stores in Bronx, Brooklyn & Jamaica.
AND GUESS WHAT??? Cookie's Kids is offering Midwestern Girl readers 10% off on ANY purchases made between now and November 30! No minimum purchase required! Woo hoo!!! Just use the code: midwesternsewinggirl at checkout. Isn't that awesome???
***Free Shipping on all orders. Excludes Furniture, Gear and Toys. Contiguous U.S. Only. Expires 11/30/12***
And here are just some really fun facts about the origin of Cookie's Kids...
In 1972, a young man named Cookie and his brother Marvin went into business together. They rented a 1600 square foot store in Jamaica, Queens, fixed it up, bought inventory and Summer and Fall, and opened a day after Thanksgiving with a full stock of holiday toys. The toys were a success and they put the extra money toward buying children's clothing for the next season. When that did well, they bought more clothing. The business was on it's way.
As the brothers Cookie, Marvin and Sonny, who had come in as a third partner in the business, began to open new stores in new locations, inventory expanded. Besides the latest fashions, our customers wanted shoes, toys, backpacks and accessories and we were prepared to deliver.
By the late 1990's there were six superstores throughout the NYC area, and though they previously had different names, by that time they were all named Cookie's Kids. Also in the late '90s came an important addition to Cookie's Kids' inventory: school uniforms. It was the steady success in uniform sales that paved the way for founding CookiesKids.com in 2007, which originally sold uniforms and soon after the entire Cookie's Kids Inventory.
DISCLOSURE: I am a member of the Collective Bias™ Social Fabric® Community. This shop has been compensated as part of a social shopper insights study for Collective Bias™ and CookiesKids.com #CBias #SocialFabric. All opinions are my own.
Subscribe to:
Posts (Atom)


