posts in category Valentine's Day
2.05.2020

Valentine's Day | Handmade Stamped Cards
Good morning, good morning!
Happy February!
Today I'm sharing some Valentine's Day cards I created using some of Kerri Bradford's new stamps.
If you've never bought any of Kerri's stamps, well then, you're definitely missing out.
This girl has THE BEST designs.
And here are the cards I created with them...


I created these cards using pre-made 5x7 cards that I just cut right down the middle - making two 5x3.5 cards.
For the envelopes I did the same exact thing...just cut straight down the middle of a 5x7 envelope to create two new envelopes.

After adding the cards to the envelopes, I used a little piece of washi to hold the envelope tops closed...easy peasy.
xoxo
Looking for more KBS stamping inspiration?
Take a look at these posts:
Hamilton (via Kerri Bradford)
Thanksgiving Favors (via Kerri Bradford)
Got a Plan? (via Kerri Bradford)
Words All Around (via Kerri Bradford)
Feast on This (via Kerri Bradford)

1.24.2020

Valentine's Day Decor | Foundations Decor
Do you decorate your house for Valentine's Day?
I really don't. Not usually, anyway.
But this year I decided to put out a few things to brighten up the place after the put-all-the-Christmas-stuff-away letdown. Isn't that just the absolute worst? I swear, January & February are just. so. blah.
Anyway...moving on...
I added a few pink pillows and some faux roses to our living room...and I also decided to add one of the little wood DIY pieces I've received from Foundations Decor.

Foundations Decor (in association with Fancy Pants Designs) has some really darling stuff - have you checked it all out yet?
In addition to the latest paper collections from Fancy Pants Designs, Foundations Decor carries unfinished wood decor that you can customize with paper, paint, embellishments, whatever your heart desires!
For this project, I started with the pine & MDF Pickup Truck.

Each piece is separate from all of the other pieces so that you can truly customize each and every shape.
I chose to use both paint and paper to decorate my Pickup.
This is the Collection Kit I used...Good Ol' Days...
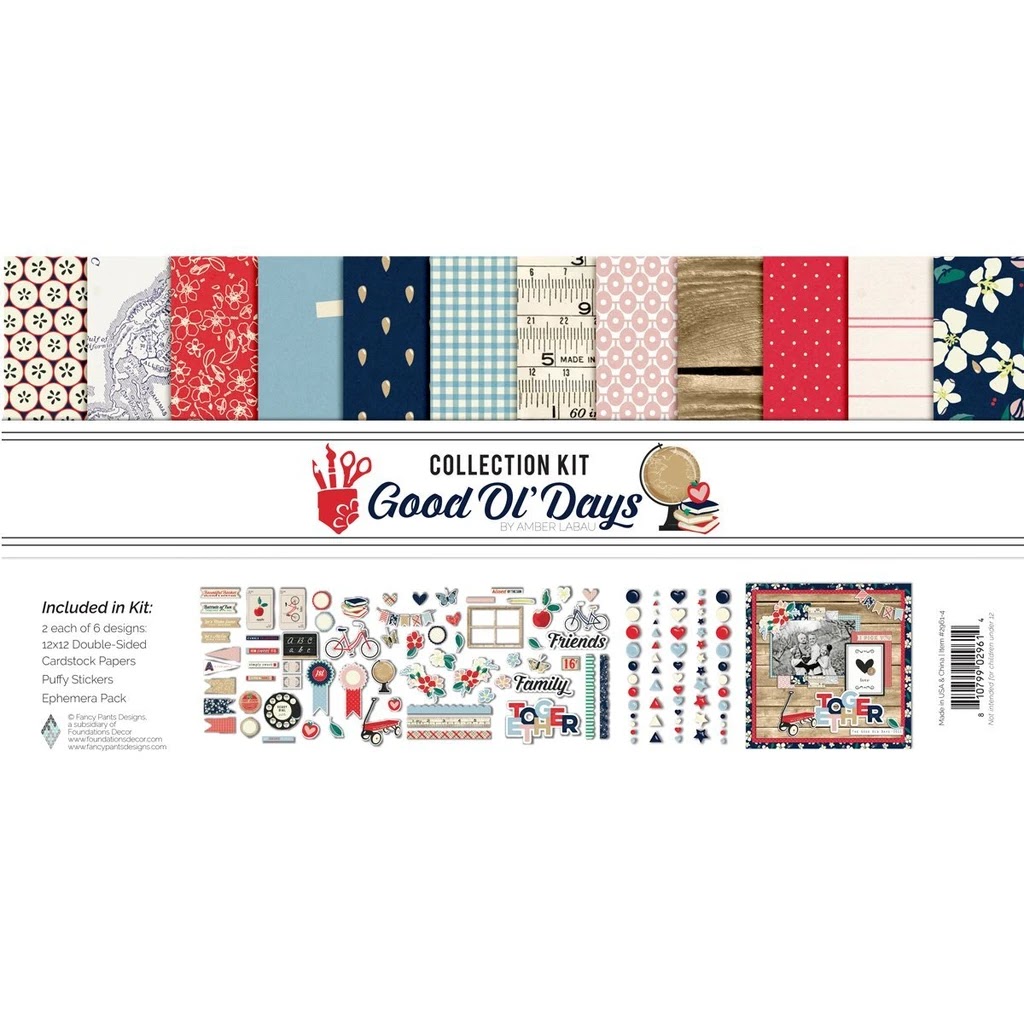
...and these are the individual pieces from that Kit that made their way into my project...


I started by painting the main truck body white.
Then I painted the tire areas black.

When the paint was dry, I dry-brushed the white paint with black, and the black paint with white...just to add a little character and to take away some of the starkness of the paint.

I grabbed the wheel hubs & flatbed gate pieces, and traced them onto a piece of the McIntosh paper.
I cut out each piece and used a tape runner to adhere the pieces to the wheel hubs/gate pieces.
Then I just glued everything together! Easy peasy...

Next, I glued a little black heart from the Good Old Days Ephemera Pack to the back of the truck...and then I popped on a little puffy heart .
And changing her out during the year will be totally easy. New flowers (or a Christmas tree!) and a couple of new embellishments will take this little decor piece from season to season...

Take a look at all that Foundations Decor has to offer...you just may find something you can't live without...
And use my coupon code:
MAGGIEMASSEY
MAGGIEMASSEY
at checkout to get 10% off your order!
Yayayayay!
Looking for more Valentine's Day inspiration?
Take a look at these posts...
Valentine's Day Planner Dashboard
Valentine's Day Tags
Valentine's Day Paper Candy Cones
Thank you so much for stopping by to take a look!
xoxo
PLEASE NOTE: Foundations Decor & Fancy Pants Designs sends me product several times each year to use in my projects. From time to time, my posts will include affiliate links.
2.07.2019

Valentine's Day | Handmade by Heidi
Hello, hello, everyone!
If you're anything like me, you struggle with what to give your older kids for smaller holidays, like Valentine's Day. Items from the Target Dollar Spot just don't seem to cut it anymore, and you (read, I...) don't want to buy expensive gifts, just for the sake of having something to give them.
So, gift cards it is!
And truthfully, it's all they really want anyway, sooooo...
But tossing them a naked little square of plastic really isn't my thang, so this year's Valentine's Day gift cards are getting a little fancy packaging.
Heidi's new Handmade by Heidi Kits (available now on Joann.com) include some of the most wonderful stationery and embellishments...especially perfect for creating my gift-card holders.

To start, I grabbed some of my favorite things from the collection...
- "Hugged" A2 cards/envelopes
- "Hello Gorgeous" A2 cards/envelopes
- "You Rock" A2 cards/envelopes
- Stationery Tag Kit - Bows
- Stationery Tag Kit - Hello
- Stationery Tag Kit - Heart
- Stationery Embellish Kit - Pink
- Stationery Embellish Kit - Gold

Next, using my 1" hole punch, I notched out a little semi-circle from each of the front pages of my cards.
Then I stitched along the bottom and up the right-hand side of each card, creating a pocket.
NOTE: If you don't have a sewing machine, or would prefer not to use it, you can always use a tape runner to seal your edges together.

I typed up little notes for each of the kids on some white cardstock, then I attached a mix of tags and acrylic embellishments to the top using some of the string included in each Tag Kit.

I slipped each card into the pocket I created, letting the tags hang over the front...


...and added each gift card to the pocket.

Then I decorated each envelope a bit with pieces from the Embellish Kits.

Finally, I tucked each card/pocket/giftcard/tag bundle into its respective envelope, sealed them up and set them out...to be opened on February 14.
I hope they love them...

You can find everything I used for this project right now at Joann.com...
Thank you so much for stopping by!
1.27.2016

Valentine's Day Hot Cocoa Bar - Heidi Swapp
Who loves hot chocolate?
Me, too!!!
And who loves Valentine's Day?
Well, I sorta do...
But I love the idea of combining the two!
Here in the Midwest it is cooo-old (not like that's unusual - I mean, it is January, but still...) - and it will be for at least another 4 months or so.
So I thought a hot cocoa bar would be a great way to help beat the cold and get a jump on Valentine's Day celebrations!
So I fired up my Minc, grabbed my Marquee Love Chalkboard and a few little other extras and set up a quick and easy party!

Little banners and garlands always make a regular day feel like a party, so I whipped some up using Heidi Swapp's brand new Hello Gorgeous (Memory Planner 2016) paper pad...I love that black pokie paper! Then I wrote the words "hot cocoa" on my chalkboard and turned on those gorgeous lights!

Some red foil and pinwheels add to the whimsical party feel...and I'll be honest - I hadn't used my red foil even once before now and I'm kicking myself for never having tried it before...it's so gorgeous!

I think this little stripey pinwheel is so cute just resting in a mug...

I added this glittered "love" (from Jen Hadfield's DIY Home Collection for Pebbles Inc./American Crafts) to my little cookie display...I stinking adore this...

A few bowls of goodies (marshmallows, chocolate chips, white chocolate chips & mint chocolate candies) and done. Seriously, this little set up took less than 30 minutes and the kids loved it! Aw, heck - let's be honest, I loved it...
How are you going to be celebrating Valentine's Day? I'd love to hear what special touches will be adorning your party table!
SUPPLIES: Heidi Swapp Marquee Love Chalkboard, Heidi Swapp Minc Pinwheels, Heidi Swapp Minc, Heidi Swapp Minc Red Foil, Heidi Swapp Hello Gorgeous Memory Planner 2016 Paper Pad
1.05.2016

a darling little gift box...with Marquee Love!
Hey hey everyone!
I'm so excited to share this project with you today! My dear friend, Kim Jeffress inspired this little box and I'm so grateful for her creative genius...
Are you looking for a fun, unique gift for a loved one? Something that can be used long after a holiday or celebration? Well then, this little Heidi Swapp Marquee Love Heart gift box is just what you've been looking for...


I'm so excited to share this project with you today! My dear friend, Kim Jeffress inspired this little box and I'm so grateful for her creative genius...
Are you looking for a fun, unique gift for a loved one? Something that can be used long after a holiday or celebration? Well then, this little Heidi Swapp Marquee Love Heart gift box is just what you've been looking for...
Heidi's brand new collection of Marquee Love shapes and accessories have just been released and they wonderful! The new patterns and colors definitely scream spring...
Creating this little box is really not hard...but it is a bit time consuming.
You'll need the following: (all materials - except maybe the chocolates - can be found at Michaels Stores)
*A Marquee Love Heart
*Marquee Love Tape, both 2" and 1" sizes
*Marquee Love Patterned Paper
*Marquee Love Paper Flowers
*Marquee Love Faceted Bulb Caps
*Heidi Swapp Color Shine
*White cardstock
*Pencil
*Scissors
*Glue
*Makeup wedges
To create your box lid:
1. Start by tracing your shape onto a piece of white cardstock...twice. You will use one of these tracings now and one later.
2. Cut JUST ONE of your traced shapes out - staying just a smidge (maybe 1/8") outside your trace line. This will ensure that the lid will fit over your marquee shape.
3. Adhere your white cardstock heart to the back of a piece of patterned paper and cut around your shape. You know have a 2 layer heart that will act as the top of your lid.
See how the soon-to-be-lid stretches slightly over the marquee shape?
Now we're going to add the sides of the lid...
4. Cut several strips of white cardstock (length doesn't really matter) to 1.5" wide. My shape used 2 strips that were 12" x 1.5".
5. Using your 1" glitter tape, tape the long side of your strip, being careful to keep your edges straight.
6. Use a bone folder or stylus to score a line down the edge of your tape where it meets the cardstock. This will allow you to fold your cardstock more easily. Fold the cardstock away from the tape.
7. Starting at the bottom point of your heart, glue (I used plain old white glue) the cardstock to the underside of your lid, making sure to keep your taped edge flush against the top of the lid. This process takes a bit of time, but as you start working it will get easier.
8. In order for your tape to wrap around your lid correctly, you will need to little slits into the cardstock edge. This will allow them to bend easily. I cut the slits as I went, but you may find it easier to cut them first - before you start gluing.
9. Continue cutting, bending & gluing around your entire shape, making sure your glittered edge is right up against your lid edge, until you come to the end of your shape. I then cut a little "v" out of white cardstock to attach to the inside bottom point of my heart to keep the lid sides together.
10. Now here's where you will use your other traced heart. Cut this heart out just slightly inside your tracing, and adhere it to the inside of your lid. This will cover up your glued areas and will give the lid a more finished look.
And guess what?! Your lid is finished! Looks good, huh?
Moving on...
11. Decorate your marquee shape with the decorative tape - 2" tape on the outside edges, 1" tape on the inside edges. If you've never decorated a Marquee Love shape before here is a quick run-through...
12. Add your paper flowers. These little paper flowers are specially designed to fit into Marquee Love shapes and come ready with a hole in the middle. Simply place them over the bulb cap hole in the shape and push in your bulb cap. Easy peasy.
To add color to the tips of your paper flowers, spray the edge of a makeup wedge with Color Shine and rub over your flower edges.
13. String your lights according to the included instructions, add batteries and you are done with your shape!
14. To turn your shape into a box, trace the inside heart onto white cardstock and cut outside the edges of your tracing (just like we did in Step 2). Add a line of white glue to the edge of your inside heart and add your cardstock. Allow to dry. You may also choose to make this piece more sturdy by using cardboard or coverstock instead of cardstock for this little heart. I like to use cardstock because it is easier to remove after the candy is all gone...
15. Add your candy (or whatever!) and your lid and you are finished! Isn't that little box just so darling?!
What a fun gift for your honey, or kids' teachers or friends! Or maybe just for you...
SUPPLIES; Heidi Swapp Marquee Love Heart, HS Marquee Love Rose Gold Glitter Tape 2", HS Marquee Love Rose Gold Glitter Tape 1", HS Marquee Love Wood Grain Tape 2", HS Marquee Love Wood Grain Tape 1", HS Marquee Love Mint Faceted Bulb Caps, HS Marquee Love Paper Flowers, HS Marquee Love Spring Paper Pad, HS Color Shine - Mint, white cardstock, makeup sponge, chocolate candy (yum)
*All Heidi Swapp products can be found at Michaels Stores*
2.13.2014

#HeidiSwappSayILoveYou - a layout...
Today on the Heidi Swapp blog I am sharing this layout I created using Heidi's new Hello Today Collection...head on over to read all about it...
Thank you so much for stopping by!
Thank you so much for stopping by!
Subscribe to:
Posts (Atom)